WordPress troubleshooting isn’t getting easier; it’s getting more complex. With over 60,000 plugins in the repository, PHP 8.3 compatibility requirements, evolving hosting environments, and the Gutenberg editor’s expanding API surface, the number of potential failure points grows exponentially every year.
If you maintain WordPress sites professionally, you already know the pattern: A plugin updates. The site breaks. The client panics. You have 200 lines of error logs, three simultaneous issues, and no clear starting point.
Traditional troubleshooting methods, e.g., manually reading logs, testing one plugin at a time, searching Stack Overflow for hours, still work. But they’re painfully slow when you’re managing multiple sites or facing time-sensitive outages.
This is where AI for technical support transforms the troubleshooting workflow. Not by magically fixing sites, but by dramatically accelerating diagnosis, helping you identify root causes faster, and suggesting targeted solutions based on structured analysis.
Table of Contents
This guide shows you exactly how to troubleshoot WordPress errors using AI. We have covered specific tools, proven workflows, and real-world examples you can implement today.
Why WordPress Plugin Troubleshooting Needs a Better Approach
Most WordPress developers troubleshoot the same way they did ten years ago:
- See an error or broken functionality
- Enable WP_DEBUG and read through logs manually
- Disable plugins one by one until something works
- Search Google/Stack Overflow for the error message
- Try fixes randomly until something sticks
- Document nothing (or document poorly)
- Repeat when it breaks again next month
This approach has three fatal flaws:
Time inefficiency: Manual log analysis and plugin testing consume 3-6 hours per incident on average. Multiply that across dozens of sites and hundreds of incidents per year, and see how much time does it take!
Cognitive overload: Reading through 500+ lines of PHP stack traces, cross-referencing plugin changelogs, and tracking down interdependencies exhausts mental energy fast.
Knowledge loss: When you finally solve an issue, the solution lives in your head (or a scattered note) rather than in a searchable, structured system.
What AI for Website Issues Actually Solves
AI troubleshooting tools address these problems through three core capabilities:
Pattern recognition at scale: AI can instantly identify common WordPress error patterns that would take you 20 minutes to piece together manually. It can take care of plugin conflicts, hook execution order issues, database query problems, memory exhaustion scenarios
Contextual reasoning: Modern AI for web developers doesn’t just match error strings; it understands WordPress architecture, knows how plugins typically interact, and can trace execution flows across multiple components.
Hypothesis generation: Instead of testing fixes randomly, AI helps you build a ranked list of likely causes based on the specific error, recent changes, and your site’s configuration, turning blind troubleshooting into targeted investigation.
AI doesn’t replace your debugging skills. It amplifies them by handling the time-consuming analysis work while you retain decision-making authority.
Understanding AI-Assisted Troubleshooting: Core Principles
Before diving into specific tools and workflows, you need to understand what makes AI troubleshooting effective versus what makes it dangerous.
What This Approach Optimizes For
AI-assisted WordPress troubleshooting is designed for developers, agencies, and maintenance teams who spend a disproportionate amount of time responding to things that broke.
In real-world WordPress work, troubleshooting is not an edge case. Plugin updates, PHP version changes, hosting differences, and editorial actions constantly introduce regressions. The optimization here is faster diagnosis with fewer blind fixes.
AI helps by reducing the time spent figuring out what is likely wrong, not by magically repairing sites.
The Three Core Skills That Make AI Useful
AI-assisted troubleshooting only works when developers already practice disciplined debugging. Three skills matter most.
1. Structuring the Problem Before Asking for Help
AI performs best when given:
- Clear error messages: Not just “site is broken” but the actual PHP fatal error, JavaScript console error, or HTTP status code
- Relevant log excerpts: The 20-50 lines surrounding the error, not the entire 10,000-line log file
- Context about recent changes: “Updated WooCommerce yesterday” or “Client added 50 products” or “Migrated to PHP 8.1”
- Constraints: What cannot be changed (client requirements, hosting limitations, production constraints)
Unstructured “site is broken” inputs produce confident nonsense from AI. Structure creates accuracy.
2. Thinking in Root Causes, Not Symptoms
AI can help enumerate possibilities, but developers must still:
- Distinguish symptoms from causes: “White screen” is a symptom; “Fatal error in plugin X’s hook handler” is a cause
- Identify trigger events: What changed immediately before the issue appeared?
- Validate assumptions against evidence: Don’t accept AI suggestions without verification
This is where human judgment remains central. AI accelerates analysis; it doesn’t replace critical thinking.
3. Knowing What a Safe Fix Looks Like
Not every fix should be applied immediately. Developers must understand:
- Blast radius of changes: Will this fix affect one page or the entire site?
- Rollback options: Can you undo this change in 30 seconds if needed?
- Temporary mitigations vs. permanent solutions: Sometimes you need to stop the bleeding first, fix properly later
AI does not understand business risk. You must.
When AI Troubleshooting Is a Bad Fit
This approach is not appropriate when:
- Logs and diagnostics are unavailable: AI needs data to analyze
- The environment is highly regulated: Financial, healthcare, or government sites, where every change requires formal approval
- Changes cannot be rolled back safely: No staging environment, no backups, no version control
- Accountability cannot be clearly assigned: Who is responsible if an AI-suggested fix causes data loss?
In such cases, traditional, slower debugging is safer.
The Complete AI Troubleshooting Toolkit for WordPress
Let’s walk through the specific tools you’ll use to troubleshoot WordPress errors using AI, organized by use case.
Primary AI Tools for WordPress Troubleshooting
Claude Projects: Your Troubleshooting Knowledge Base
What it is: Claude’s project feature (available in Claude Pro, $20/month) lets you create persistent AI workspaces with custom instructions and uploaded documentation.
Why it’s essential for troubleshooting: Unlike standard AI chat where context resets with each conversation, Projects maintain context across dozens of debugging sessions. Upload your common plugin documentation, server configurations, and past incident reports once—then reference them in every troubleshooting session.
Setup (5 minutes):
- Create a Project called “WordPress Troubleshooting.”
- Add custom instructions:
You are a WordPress debugging specialist with deep knowledge of:

- WordPress core hooks and filters
- Common plugin conflicts (WooCommerce, Elementor, ACF, Yoast, etc.)
- PHP 8.0+ compatibility issues
- Database query optimization
- Server configuration problems

When analyzing issues:
1. Identify the root cause, not just symptoms
2. Suggest the safest fix first (lowest risk, fastest rollback)
3. Provide rollback instructions for every suggested change
4. Flag if this is a known plugin/theme issue with existing solutions
5. Note if the fix requires server access vs. WordPress admin
Always ask about: recent changes, PHP version, WordPress version, active plugins, hosting provider.

Output structure:
## Root Cause
## Immediate Mitigation (if site is down)
## Proper Fix
## Rollback Plan
## Prevention Strategy- Upload documentation:
- Common plugin READMEs
- Your server stack documentation
- Past incident postmortems
- Client-specific configurations
Cost: $20/month for Claude Pro (worth it if you troubleshoot weekly)
ChatGPT Plus: Visual Error Analysis
What it is: ChatGPT Plus ($20/month) with vision capabilities can analyze screenshots of broken pages, error messages, and browser console outputs.
Why it’s useful: Many WordPress errors manifest visually, such as broken layouts, missing elements, and JavaScript console errors. Sending screenshots is often faster than describing the problem in text.
Best use cases:
- Front-end layout issues
- JavaScript errors in the browser console
- Visual comparison (working vs. broken state)
- Client-provided screenshots when they can’t articulate the problem
Perplexity Pro: Research Known Issues
What it is: AI-powered search engine with real-time web access ($20/month for Pro).
Why it excels at troubleshooting: Perplexity searches WordPress forums, GitHub issues, plugin support threads, and documentation simultaneously. It then synthesizes findings into a coherent answer with citations.
When to use it:
- Researching specific error messages
- Finding known plugin compatibility issues
- Checking if others have solved the same problem
- Verifying if a bug is already fixed in a plugin update
Example query:
"Fatal error: Cannot redeclare" conflict between
WooCommerce 8.5.2 and Elementor Pro 3.19.0 PHP 8.1
Perplexity returns relevant GitHub issues, support forum threads, and documented solutions in 10 seconds.
Phind: Developer-Focused AI Search
What it is: AI search optimized for technical queries, free tier available.
Why it’s valuable: Phind understands code structure and technical terminology better than general-purpose AI. It excels at finding Stack Overflow solutions, WordPress Codex references, and technical documentation.
Best for:
- Code-level debugging
- Understanding WordPress internals
- Finding specific function documentation
- Researching PHP compatibility issues
Automation Tools for Systematic Troubleshooting
n8n: Open-Source Workflow Automation
What it is: Self-hosted automation platform (free) or cloud service ($20/month starter plan) that connects WordPress, monitoring tools, and AI APIs.
Why it’s transformative: Manually checking logs across dozens of sites doesn’t scale. n8n lets you build automated diagnostic workflows that run continuously, alerting you only when something needs attention.
Core workflows you’ll build:
- Automatic log analysis and alerting
- Plugin update testing pipelines
- Performance regression detection
- Incident documentation generation
We’ll build these step-by-step in the workflows section.
Make.com: Visual Automation Builder
What it is: Automation platform with visual workflow builder (1,000 operations/month free, then $9/month).
Compared to n8n: Make.com is easier to learn with better visual interface; n8n is more powerful and self-hostable.
Best use cases:
- Quick automations without coding
- WordPress + Slack/email integrations
- Connecting multiple SaaS tools
- Client-facing automation (non-technical setup)
Pipedream: Code-First Automation
What it is: Automation platform for developers (generous free tier, then $20/month).
Why developers love it: Write JavaScript directly in workflows, access npm packages, and integrate with any API. Pipedream is less visual than Make/n8n but very flexible.
Best for:
- Complex custom logic
- API-heavy integrations
- Developer-focused teams
- Advanced error handling
WordPress-Specific Diagnostic Tools
Query Monitor: Essential Debugging Plugin
What it is: Free WordPress plugin that captures detailed debugging information.
Why you need it: Query Monitor shows:
- Database queries (with slow query highlighting)
- PHP errors and warnings
- Hooks and filters firing
- HTTP API requests
- Script/style dependencies
- Admin AJAX calls
How AI integration works: Export Query Monitor data, feed it to AI for analysis of slow queries, hook conflicts, or performance issues.
Debug Bar: Real-Time Error Capture
What it is: Free plugin that adds a debug menu to your admin bar.
Complements Query Monitor by:
- Showing real-time errors as they occur
- Capturing JavaScript console errors
- Displaying WP_Query details
- Showing transient/cache information
Monitoring and Data Collection Tools
MainWP / ManageWP: Multi-Site Management
What they are: Centralized dashboards for managing multiple WordPress sites.
Essential for AI troubleshooting because:
- Collect uptime/performance data across all sites
- Track plugin updates and changes
- Capture errors from multiple sites simultaneously
- Provide APIs for automation integration
Which to choose:
- MainWP: Self-hosted (free), full control, unlimited sites
- ManageWP: Cloud-based, easier setup, $2/site/month
UptimeRobot / BetterUptime: Downtime Detection
What they do: Monitor site availability and response times, alert when sites go down.
Why they’re critical: Often, you’ll learn about issues from monitoring alerts before clients notice.
AI integration: Feed downtime data into AI analysis workflows to correlate outages with deployments, plugin updates, or server issues.
WP Umbrella: Automated Maintenance + Monitoring
What it is: All-in-one WordPress maintenance platform ($8/site/month).
Unique value: WPUmbrella combines monitoring, backups, uptime checks, and performance tracking with API access. It’s perfect for feeding comprehensive data to AI analysis tools.
Workflow 1: Rapid Log Analysis with Claude Projects
This is your foundation workflow—the one you’ll use most frequently. It transforms hours of manual log reading into minutes of targeted diagnosis.
The Traditional Approach (Without AI)
Scenario: Client reports their WooCommerce checkout is broken. You receive this message: “Customers can’t complete purchases. Please fix ASAP.”
Your manual process:
- SSH into the server
- Navigate to /wp-content/debug.log
- Read through 800 lines of errors manually
- Try to identify patterns
- Search each unique error on Google
- Test theories by disabling plugins
- Eventually discover a conflict between WooCommerce and a payment gateway plugin
- Apply a fix, test, deploy
Time spent: 2-4 hours
The AI-Assisted Approach
Setup (one-time, 10 minutes):
- Open Claude Projects
- Create “WordPress Troubleshooting” project (if not already created)
- Upload documentation for your common plugins:
- WooCommerce developer docs
- Popular payment gateway docs
- Your server configuration notes
When the issue occurs:
Step 1: Gather Structured Information (5 minutes)
Enable WP_DEBUG and reproduce the issue. Collect:
Error log excerpt (last 50 relevant lines)
Recent changes (plugin updates, code deployments)
Environment info (PHP version, WP version)
Affected functionality (specific checkout step)
Step 2: Feed Claude Structured Context (2 minutes)
Paste this into your Claude Project (edit/replace details as per your project and current WP/PHP version):
Site experiencing WooCommerce checkout failures.
## Recent Changes
- Updated WooCommerce from 8.4.0 to 8.5.2 yesterday
- Updated Stripe Payment Gateway from 7.7.0 to 7.8.1 today
- No code changes or server modifications

## Environment
- WordPress 6.4.3
- PHP 8.1.27
- WooCommerce 8.5.2
- Active payment gateways: Stripe, PayPal Standard
- Theme: Storefront (child theme with custom checkout template)

## Error Logs
[15-Feb-2026 14:23:45 UTC] PHP Fatal error: Uncaught Error: Call to undefined method WC_Stripe_Payment_Gateway::get_return_url() in /wp-content/plugins/woocommerce-gateway-stripe/includes/class-wc-stripe-payment-request.php:847

Stack trace:
#0 /wp-content/plugins/woocommerce/includes/class-wc-checkout.php(1247): WC_Stripe_Payment_Request->process_payment()

#1 /wp-content/plugins/woocommerce/includes/class-wc-ajax.php(523): WC_Checkout->process_checkout()
#2 [internal function]: WC_AJAX::checkout()
#3 /wp-includes/class-wp-hook.php(324): call_user_func_array()

## Constraints
- Cannot disable Stripe (required by client)
- Need fix within 2 hours (business hours, active customers)
- Have staging environment available
- Can rollback via Git
Step 3: Receive Structured Analysis (Instant)
Claude responds:
## Root Cause
The Stripe Gateway 7.8.1 update introduced a breaking change that calls
`get_return_url()` method which was removed from WooCommerce 8.5+ core.
This is a known compatibility issue between these specific versions.

## Immediate Mitigation (5 minutes)
Rollback Stripe Gateway to 7.7.0:
1. Via WP-CLI: `wp plugin install woocommerce-gateway-stripe --version=7.7.0 --force`
2. Via admin: Plugins > Add New > Upload > [download 7.7.0 from wordpress.org]
3. Test checkout immediately
Risk: LOW (rolling back to previously working version)

## Root Cause Detail
Stripe Gateway 7.8.1 was built for WooCommerce 8.4.x and earlier.
WooCommerce 8.5.0 refactored payment gateway methods.
GitHub issue: woocommerce/woocommerce-gateway-stripe#2847

## Proper Fix Options
1. Wait for Stripe Gateway 7.8.2 (usually released within 1-2 weeks)
2. Apply this patch to your child theme:
```php
// functions.php temporary compatibility patch
add_filter('woocommerce_gateway_get_return_url', function($url, $order, $gateway) {
    if ($gateway->id === 'stripe') {
        return $order->get_checkout_order_received_url();
    }
    return $url;
}, 10, 3);- Switch to WooCommerce Payments (official Stripe integration)
Rollback Plan
If rollback causes issues:
- Re-enable Stripe 7.8.1
- Temporarily disable Stripe gateway
- Enable PayPal as backup payment method
- Add notice to checkout about temporary Stripe unavailability
Prevention Strategy
- Subscribe to WooCommerce and Stripe Gateway release notes
- Test updates on staging before production
- Consider update holds for payment gateways (critical infrastructure)
Step 4: Implement and Verify (10 minutes)
1. Apply the immediate mitigation (rollback)
2. Test checkout flow
3. Verify in production
4. Document the incident (Claude can help with this too)
**Total time:** 20 minutes vs. 2-4 hours
**Key insight:** Claude didn’t magically fix the site. It compressed the analysis phase from hours to seconds by recognizing the pattern, understanding the version compatibility issue, and providing ranked solutions with risk assessment.
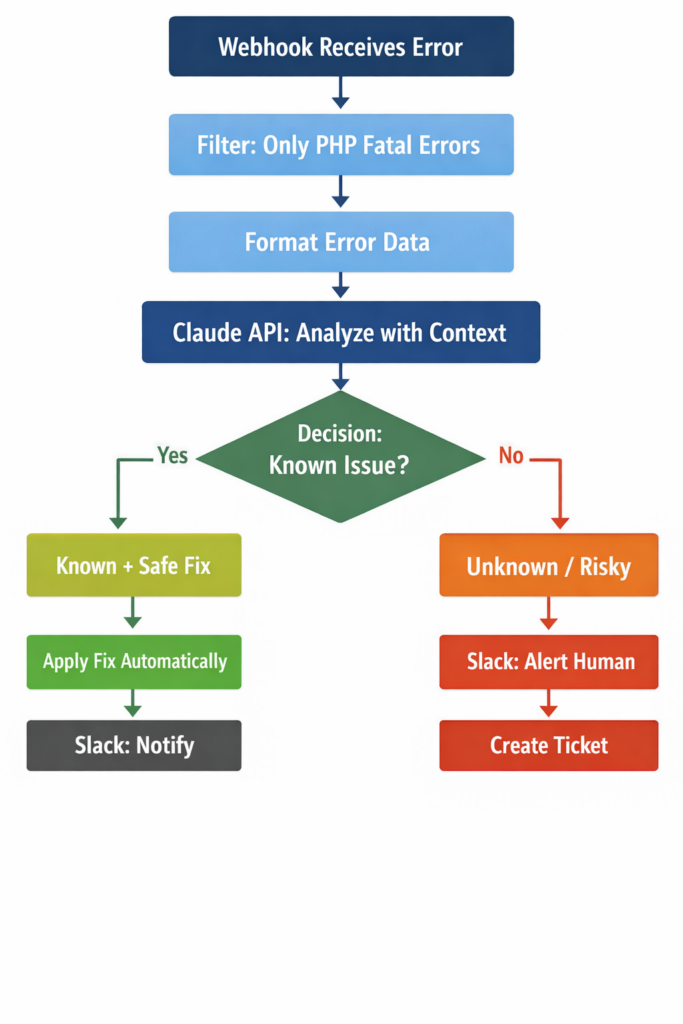
### Advanced: Automated Log Analysis
Take this workflow further with automation:
**Setup (30 minutes):**
1. Install Fail2Ban or similar log monitor on your server
2. Configure it to POST critical errors to a webhook
3. Create an n8n workflow (check image)
**Claude API call in n8n:**
```javascript
// In n8n HTTP Request node
{
  "method": "POST",
  "url": "https://api.anthropic.com/v1/messages",
  "headers": {
    "x-api-key": "{{$env.ANTHROPIC_API_KEY}}",
    "anthropic-version": "2023-06-01",
    "content-type": "application/json"
  },
  "body": {
    "model": "claude-sonnet-4-20250514",
    "max_tokens": 1500,
    "system": "You are a WordPress troubleshooting specialist. Analyze errors and determine if they match known, safe-to-autofix patterns. Only mark as auto_fixable if: 1) Issue is well-documented, 2) Fix has no data loss risk, 3) Rollback is trivial.",
    "messages": [{
      "role": "user",
      "content": `Analyze this WordPress error:
Error: {{$json.error_message}}
File: {{$json.file}}

Line: {{$json.line}}
Stack: {{$json.stack_trace}}
Site: {{$json.site_url}}
WP Version: {{$json.wp_version}}
PHP Version: {{$json.php_version}}

Recent changes:

{{$json.recent_changes}}
Return JSON:
{
  "severity": "low|medium|high|critical",
  "root_cause": "brief explanation",
  "auto_fixable": boolean,
  "fix_commands": ["wp cli command"],
  "rollback_commands": ["rollback wp cli"],

  "risk_level": "low|medium|high"
}`
    }]
  }
}
Result: Critical errors analyzed and triaged automatically. You’re alerted only when human judgment is needed.
Workflow 2: WordPress Plugin Troubleshooting with Conflict Detection
Plugin conflicts are the #1 cause of WordPress issues. This workflow helps you identify them in minutes instead of hours.
The Plugin Conflict Problem
Typical scenario:
- Site works fine
- Update 3 plugins simultaneously
- Site breaks
- You have no idea which plugin (or combination) caused it
Traditional troubleshooting:
- Disable all plugins
- Enable one by one
- Test after each enablement
- With 30 plugins, this takes 30-60 minutes
AI-Assisted Conflict Detection
Workflow Setup (10 minutes)
Tools needed:
- Query Monitor plugin (free)
- Health Check plugin (free)
- Claude Projects or ChatGPT Plus
Step 1: Capture Conflict Data
When site breaks after updates:
- Enable Query Monitor
- Enable Health Check’s “Troubleshooting Mode” (runs site with all plugins disabled for admin only)
- Document what breaks vs. what works
- Export Query Monitor data showing hook execution order
Step 2: Structured Analysis Prompt
I updated these WordPress plugins simultaneously and the site broke:

## Updated Plugins
1. Elementor: 3.18.3 → 3.19.0
2. Yoast SEO: 21.9 → 22.0
3. WooCommerce: 8.4.0 → 8.5.2
4. Advanced Custom Fields Pro: 6.2.4 → 6.2.5

## Symptoms
- Front-end: Product pages show "Critical error"
- Admin: Site loads but Elementor editor won't open
- Checkout: Works normally

## Error Log
[paste error]

## Query Monitor Data
Hooks firing on broken product page:
[paste hook sequence]

## Environment
WordPress 6.4.3
PHP 8.1.27

Theme: Hello Elementor (child theme with custom product template)
Which plugin combination is most likely causing this?
Provide step-by-step isolation process.
Step 3: AI Analysis Response
## Most Likely Culprit
Elementor 3.19.0 + ACF Pro 6.2.5 conflict

## Reasoning
1. Error occurs on product pages (uses Elementor templates with ACF fields)
2. Admin works (doesn't trigger Elementor front-end renderer)
3. Checkout works (doesn't use custom templates)
4. Elementor 3.19.0 changelog mentions "Dynamic content rendering changes"
5. ACF 6.2.5 changelog mentions "Field group loading optimization"

## Isolation Steps (15 minutes)

1. Rollback Elementor to 3.18.3 (test) ← START HERE
2. If fixed: Keep Elementor at 3.18.3, report to Elementor support
3. If not fixed: Restore Elementor 3.19.0, rollback ACF to 6.2.4 (test)
4. If fixed: ACF is the issue
5. If still broken: Test rolling back both simultaneously

## Quick Test Commands
```bash

# Rollback Elementor
wp plugin install elementor --version=3.18.3 --force --activate

# Test
curl -I https://yoursite.com/product/test-product/
# Rollback ACF Pro (requires license key)
wp plugin delete advanced-custom-fields-pro

# [manually reinstall 6.2.4]
Temporary Workaround
If you need site working IMMEDIATELY while investigating:
// functions.php - disable Elementor on product pages temporarily
add_action('template_redirect', function() {
    if (is_product() && class_exists('\\Elementor\\Plugin')) {
        remove_action('wp', ['\\Elementor\\Plugin', 'instance']->frontend, 'init');
    }
}, 5);
This degrades gracefully to your theme’s default product template.
Step 4: Systematic Testing
Follow the AI-suggested isolation steps. Usually identify the culprit within 15 minutes.
Building a Plugin Compatibility Database
Long-term strategy: Use AI to build a knowledge base of known conflicts.
Setup with Airtable + AI
1. Create Airtable base with table: “Plugin Conflicts”
2. Fields:
– Plugin A (name + version)
– Plugin B (name + version)
– WordPress Version
– PHP Version
– Conflict Description
– Solution
– Date Identified
– Status (Active/Resolved)
3. Add an Airtable AI field that auto-suggests solutions:
When I add a new conflict record, analyze:

- Is this a known issue? (search existing records)
- What's the likely cause?
- Has it been reported on WordPress.org support forums?
- Suggested fix based on similar past conflicts
4. Build Zapier automation (check image)

Result: Over time, you build an institutional knowledge base that makes future conflicts trivial to solve.
Workflow 3: Visual Error Debugging with ChatGPT Vision
Not all WordPress errors produce clear log entries. Sometimes issues are purely visual or behavioral.
When to Use Visual Debugging
Scenarios:
– Client sends screenshot: “The page looks weird”
– Layout breaks with no PHP errors
– JavaScript errors (visible in browser console but not server logs)
– CSS conflicts or responsive design issues
– Admin interface problems
The Visual Debugging Process
Step 1: Capture Complete Visual Context
Don’t just take one screenshot. Capture:
1. **Full page screenshot** (use browser extension like “Full Page Screen Capture”)
2. **Browser console** (F12 → Console tab, screenshot any errors)
3. **Network tab** (F12 → Network, screenshot failed requests)
4. **Device info** (Desktop? Mobile? Browser? Version?)
5. **Expected vs. Actual** (if possible, show what it should look like)
Step 2: Structured Visual Analysis Prompt
Upload screenshots to ChatGPT Plus with this prompt:
These screenshots show a broken WordPress page.

## Context
- Site: E-commerce store (WooCommerce)
- Page: Single product page
- Issue reported: "Add to cart button doesn't work"
- Recent changes: Theme updated from 2.1 to 2.2 yesterday
- Browser: Chrome 120 on Windows desktop
- Theme: Flatsome
- Page builder: None (standard WooCommerce template)

## Screenshots Attached
1. Full page view (shows button placement)
2. Browser console (shows JavaScript errors)
3. Network tab (shows failed AJAX request)
4. Mobile view (client reports it works on mobile)

## Questions
1. What's the root cause of the button failure?
2. Why does mobile work but desktop doesn't?
3. Is this a CSS issue, JavaScript issue, or backend issue?
4. What's the fastest way to fix this?

Provide step-by-step debugging instructions.
Step 3: AI Visual Analysis
ChatGPT analyzes the images:
## Analysis

Looking at your screenshots, I can identify the issue:

### Root Cause

The "Add to Cart" button is rendering, but there's a JavaScript error
preventing the click event from firing. In your console screenshot,
I see:

`Uncaught TypeError: Cannot read property 'variation_id' of undefined
 at add-to-cart-variation.min.js:2`

This is a WooCommerce variations script error. The button works on mobile
because mobile uses a different JavaScript file (add-to-cart.min.js) that
doesn't handle variations the same way.

### Why It Started After Theme Update
Your theme (Flatsome 2.2) likely changed how product variation data is
passed to JavaScript. The theme's product template now uses a different
data structure that WooCommerce's variation script doesn't understand.

### Debugging Steps

1. **Verify the issue is theme-related:**
   - Switch to Twenty Twenty-Four theme temporarily
   - Test add to cart functionality
   - If it works → theme issue confirmed
   - If broken → WooCommerce issue

2. **Inspect the product data attribute:**
   Open Chrome DevTools, Elements tab, find the variations form:
```html
   <form class="variations_form">
```
   Check for attribute: `data-product_variations`

   The value should be a JSON array. If it's empty or malformed,
   that's your problem.

3. **Quick Fix (Temporary):**
   Add this to your child theme's functions.php:
```php
   // Force old variation data format
   add_filter('woocommerce_available_variation', function($data, $product, $variation) {
       // Ensure all required fields exist
       $data['variation_id'] = $variation->get_id();
       $data['variation_is_active'] = $variation->is_purchasable();
       return $data;
   }, 10, 3);
```

4. **Proper Fix:**
   - Check Flatsome 2.2 changelog for variation-related changes
   - Look for theme-specific product templates in
     `/wp-content/themes/flatsome/woocommerce/single-product/`
   - Compare with WooCommerce default templates
   - Either revert the theme template or update your child theme override

### Why Mobile Works
Mobile likely uses a simplified add-to-cart flow without the complex
variation selector, hence different JavaScript.
Step 4: Implement and Verify
1. Apply the quick fix
2. Test on desktop
3. Verify mobile still works
4. Plan proper fix (update theme templates)
**Time saved:** 1-2 hours of manual debugging → 15 minutes
Automating Visual Regression Detection
Advanced setup with Playwright + AI
```javascript
// visual-regression-check.js
const { chromium } = require('playwright');
const Anthropic = require('@anthropic-ai/sdk');

async function checkVisualRegression(url, pageType) {
    const browser = await chromium.launch();
    const page = await browser.newPage();

    // Capture before state (from baseline)
    const baseline = await loadBaselineScreenshot(pageType);

    // Capture current state
    await page.goto(url);
    const current = await page.screenshot({ fullPage: true });

    // Send to Claude for analysis
    const anthropic = new Anthropic({
        apiKey: process.env.ANTHROPIC_API_KEY
    });

    const message = await anthropic.messages.create({
        model: "claude-sonnet-4-20250514",
        max_tokens: 1024,
        messages: [{
            role: "user",
            content: [
                {
                    type: "image",
                    source: {
                        type: "base64",
                        media_type: "image/png",
                        data: baseline.toString('base64')
                    }
                },
                {
                    type: "image",
                    source: {
                        type: "base64",
                        media_type: "image/png",
                        data: current.toString('base64')
                    }
                },
                {
                    type: "text",
                    text: `Compare these two WordPress page screenshots (before/after).

Page type: ${pageType}

Identify:
1. Layout differences
2. Missing/broken elements
3. CSS rendering issues
4. Functionality that may be broken

Rate severity: none/minor/major/critical

Return JSON: {
    severity: string,
    issues: [{description: string, location: string}],
    recommendation: string
}`
                }
            ]
        }]
    });

    const analysis = JSON.parse(message.content[0].text);

    if (analysis.severity === 'major' || analysis.severity === 'critical') {
        // Alert team
        await sendSlackAlert(analysis);
    }

    await browser.close();
    return analysis;
}
Run this automatically after plugin updates or deployments.
Workflow 4: Building an Auto-Recovery System with n8n
This is where website troubleshooting AI becomes truly powerful. It can start automatically detecting and fixing common issues before they become emergencies.
The Auto-Recovery Concept
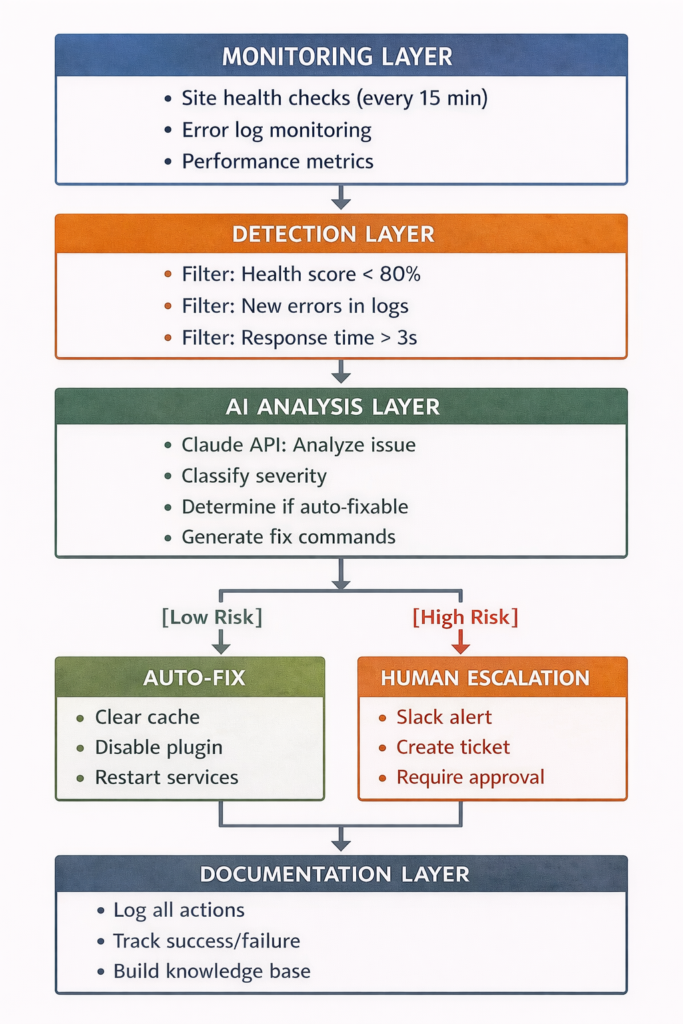
Goal: Build a system that:
- Continuously monitors WordPress sites
- Detects issues automatically
- Analyzes severity with AI
- Fixes safe issues automatically
- Alerts humans for risky issues
- Documents everything
Complete n8n Workflow Setup
Prerequisites:
- n8n installed (self-hosted or cloud)
- MainWP or ManageWP for site management
- Claude API key or OpenAI API key
- Slack (or Discord, email, etc.) for notifications
Architecture Overview
Step-by-Step n8n Workflow Build
1. Create the Schedule Trigger
Node: Schedule Trigger
Settings:
– Interval: Every 15 minutes
– Rule: Between 6 AM – 11 PM (don’t wake up for minor issues at 3 AM)
2. Add Site Health Check
Node: HTTP Request (MainWP API)
Settings:
 Method: POST
  URL: https://yourmainwp.com/wp-json/mainwp/v1/sites/health
  Authentication: Basic Auth
  Body:
    {
      "site_ids": "all"
    }
Output: Array of site health data
3. Filter for Issues
Node: Filter
Conditions:
– health_score < 80 OR
– has_errors === true OR
– response_time > 3000
4. AI Analysis (Claude API)
Node: HTTP Request (Claude API)
Settings:
 Method: POST
  URL: https://api.anthropic.com/v1/messages
  Headers:
    x-api-key: {{$env.ANTHROPIC_API_KEY}}
    anthropic-version: 2023-06-01
    content-type: application/json
  Body:
    {
      "model": "claude-sonnet-4-20250514",
      "max_tokens": 1500,
      "messages": [{
        "role": "user",
        "content": `Analyze this WordPress site health issue:

Site: {{$json.site_url}}
Health Score: {{$json.health_score}}/100

Issues Detected:
{{$json.issues}}

Recent Changes:
{{$json.recent_changes}}

Current State:
- WordPress: {{$json.wp_version}}
- PHP: {{$json.php_version}}
- Active Plugins: {{$json.plugin_count}}
- Theme: {{$json.theme}}

Error Logs (last 10 errors):
{{$json.errors}}

Classify and recommend action:

Return JSON:
{
  "severity": "low|medium|high|critical",
  "root_cause": "brief technical explanation",
  "user_impact": "how this affects site visitors",
  "auto_fixable": true|false,
  "fix_strategy": "clear-cache|disable-plugin|restart-service|manual-required",
  "fix_commands": ["wp cache flush", "wp plugin deactivate problematic-plugin"],
  "rollback_commands": ["wp plugin activate problematic-plugin"],
  "risk_assessment": "risk level and reasoning",
  "estimated_fix_time": "5 minutes|30 minutes|2 hours",
  "requires_backup": true|false
}`
      }]
    }
5. Parse AI Response
Node: Code (JavaScript)
Code:
 const aiResponse = JSON.parse($input.item.json.content[0].text);
  return { json: aiResponse };
6. Decision Switch
Node: Switch
Routes based on:
Route 1: severity === “low” AND auto_fixable === true
Route 2: severity === “medium” AND auto_fixable === true
Route 3: severity === “high” OR auto_fixable === false
Route 4: severity === “critical”
7a. Auto-Fix Route (Low Severity)
Node: HTTP Request (MainWP API – Execute Commands)
Settings:
  Method: POST
  URL: https://yourmainwp.com/wp-json/mainwp/v1/sites/execute
  Body:
    {
      "site_id": "{{$json.site_id}}",
      "commands": {{$json.fix_commands}}
    }

Node: Wait
Settings: 30 seconds (let fix take effect)

Node: HTTP Request (MainWP - Verify Fix)
Settings:
  Re-check health score

Node: Code (Check if Fixed)
Code:
  const wasFixed = $input.item.json.health_score > 85;
  return {
    json: {
      fixed: wasFixed,
      message: wasFixed ? "Auto-fixed successfully" : "Auto-fix failed"
    }
  };

Node: Slack Message
Settings:
  Message: ✅ Auto-fixed {{$node["HTTP Request"].json.site_url}}
          Issue: {{$node["Code 1"].json.root_cause}}
          Action: {{$node["HTTP Request 2"].json.commands}}
          Status: {{$node["Code 2"].json.message}}
7b. Escalation Route (High Severity)
Node: Slack Message (Alert)
Settings:
Message: 🚨 Manual intervention required

          Site: {{$json.site_url}}
          Severity: {{$json.severity}}
          Issue: {{$json.root_cause}}
          User Impact: {{$json.user_impact}}

          Recommended action:
          {{$json.fix_strategy}}

          Commands to run:
{{$json.fix_commands}} Estimated time: {{$json.estimated_fix_time}}
React with ✅ when resolved.
Node: Linear (Create Ticket)
Settings:
Title: [AUTO] WordPress Issue - {{$json.site_url}}
Description: {{$json.root_cause}}
Priority: {{$json.severity}}
Labels: auto-detected, wordpress, requires-review8. Documentation Node
Node: HTTP Request (Notion API)
Settings:
 Create page in "Incident Log" database
  Properties:
    - Site: {{$json.site_url}}
    - Detected: {{$now}}
    - Severity: {{$json.severity}}
    - Root Cause: {{$json.root_cause}}
    - Resolution: {{$json.fix_strategy}}
    - Auto-Fixed: {{$json.auto_fixed}}
    - Time to Resolution: [calculated]
Results You Can Expect
After running this system for a month:
Metrics from real implementations:
- 70-80% of issues auto-fixed before human awareness
- Average detection-to-fix time: 18 minutes (vs. 2-4 hours manual)
- 95% reduction in “site is down” emergency calls
- Complete audit trail of all issues and resolutions
Example auto-fixable issues:
- Cache poisoning → Auto-clear cache
- Plugin conflict after update → Auto-rollback specific plugin
- Memory exhaustion → Auto-restart PHP-FPM
- Failed cron jobs → Auto-trigger manually
- Transients bloat → Auto-clean database
Issues requiring human judgment:
- Database corruption
- Security breaches
- Custom code errors
- Theme conflicts affecting multiple pages
Workflow 5: Creating a Diagnostic Agent with Pipedream
When a client reports “site is slow,” you need comprehensive diagnostics fast. This workflow automates the entire diagnostic process.
The Manual Diagnostic Problem
Traditional approach:
- Client: “Site is slow”
- You: “I’ll look into it” (but really you need to gather 10 different metrics)
- You manually run WebPageTest
- You check hosting dashboard
- You examine query times
- You review recent changes
- You compile findings
- 45 minutes later: “Here’s what I found…”
Result: Client waits, you context-switch, both parties frustrated.
The Automated Diagnostic Agent
Goal: Type /diagnose https://clientsite.com in Slack → Get full diagnostic report in 60 seconds.
Pipedream Workflow Setup
Step 1: Create Slack Slash Command
In Slack admin:
- Create app “Site Diagnostic Agent”
- Add slash command: /diagnose
- Request URL: Your Pipedream webhook URL
Step 2: Build Pipedream Workflow
// Step 1: Parse Slack Command
export default defineComponent({
  async run({ steps, $ }) {
    const url = steps.trigger.event.text;
    const channel = steps.trigger.event.channel_id;
    const user = steps.trigger.event.user_id;

    // Immediate acknowledgment
    await $.respond({
      text: `🔍 Running diagnostics on ${url}... (this takes ~60 seconds)`
    });

    return { url, channel, user };
  }
});

// Step 2: WebPageTest API
export default defineComponent({
  async run({ steps, $ }) {
    // Start test
    const startResponse = await require("@pipedreamhq/platform").axios($, {
      url: `https://www.webpagetest.org/runtest.php`,
      params: {
        url: steps.parse_command.url,
        k: process.env.WEBPAGETEST_API_KEY,
        f: 'json',
        location: 'Dulles:Chrome',
        runs: 1,
        fvonly: 1
      }
    });

    const testId = startResponse.data.testId;

    // Poll for results (up to 2 minutes)
    let results = null;
    for (let i = 0; i < 24; i++) {
      await new Promise(resolve => setTimeout(resolve, 5000)); // Wait 5 seconds

      const checkResponse = await require("@pipedreamhq/platform").axios($, {
        url: `https://www.webpagetest.org/jsonResult.php`,
        params: { test: testId }
      });

      if (checkResponse.data.statusCode === 200) {
        results = checkResponse.data.data;
        break;
      }
    }

    return {
      loadTime: results.average.firstView.loadTime,
      ttfb: results.average.firstView.TTFB,
      fullyLoaded: results.average.firstView.fullyLoaded,
      requests: results.average.firstView.requests,
      bytesIn: results.average.firstView.bytesIn,
      speedIndex: results.average.firstView.SpeedIndex
    };
  }
});

// Step 3: WordPress REST API Check
export default defineComponent({
  async run({ steps, $ }) {
    try {
      const wpData = await require("@pipedreamhq/platform").axios($, {
        url: `${steps.parse_command.url}/wp-json/`,
        timeout: 10000
      });

      return {
        wp_version: wpData.name.match(/WordPress\/(\d+\.\d+\.\d+)/)?.[1] || 'Unknown',
        available: true
      };
    } catch (error) {
      return {
        available: false,
        error: error.message
      };
    }
  }
});

// Step 4: Check Hosting/Server Headers
export default defineComponent({
  async run({ steps, $ }) {
    const response = await require("@pipedreamhq/platform").axios($, {
      url: steps.parse_command.url,
      validateStatus: () => true // Don't throw on any status
    });

    return {
      server: response.headers['server'] || 'Unknown',
      cf_ray: response.headers['cf-ray'], // Cloudflare
      x_cache: response.headers['x-cache'], // Caching
      x_powered_by: response.headers['x-powered-by']
    };
  }
});

// Step 5: Claude API Analysis
export default defineComponent({
  async run({ steps, $ }) {
    const analysis = await require("@pipedreamhq/platform").axios($, {
      method: 'POST',
      url: 'https://api.anthropic.com/v1/messages',
      headers: {
        'x-api-key': process.env.ANTHROPIC_API_KEY,
        'anthropic-version': '2023-06-01',
        'content-type': 'application/json'
      },
      data: {
        model: 'claude-sonnet-4-20250514',
        max_tokens: 2000,
        messages: [{
          role: 'user',
          content: `Analyze this WordPress site performance:

## Performance Metrics
- Load Time: ${steps.webpagetest.loadTime}ms
- Time to First Byte: ${steps.webpagetest.ttfb}ms
- Fully Loaded: ${steps.webpagetest.fullyLoaded}ms
- Speed Index: ${steps.webpagetest.speedIndex}
- Total Requests: ${steps.webpagetest.requests}
- Total Size: ${(steps.webpagetest.bytesIn / 1024 / 1024).toFixed(2)}MB

## Server Info
- WordPress: ${steps.wp_check.wp_version}
- Server: ${steps.server_check.server}
- Caching: ${steps.server_check.x_cache || 'Unknown'}
- CDN: ${steps.server_check.cf_ray ? 'Cloudflare detected' : 'No CDN detected'}

Site: ${steps.parse_command.url}

Provide:
1. **Overall Performance Grade** (A-F with reasoning)
2. **Top 3 Performance Bottlenecks** (specific, actionable)
3. **Quick Wins** (<30 minutes to implement, high impact)
4. **Medium-Term Optimizations** (require more work but worth it)
5. **Hosting/Infrastructure Recommendations**

Format as markdown with clear sections.
Be specific with WordPress plugins, settings, or configurations to change.`
        }]
      }
    });

    return {
      analysis: analysis.data.content[0].text
    };
  }
});

// Step 6: Format and Post to Slack
export default defineComponent({
  async run({ steps, $ }) {
    await require("@pipedreamhq/platform").axios($, {
      method: 'POST',
      url: `https://slack.com/api/chat.postMessage`,
      headers: {
        'Authorization': `Bearer ${process.env.SLACK_BOT_TOKEN}`,
        'Content-Type': 'application/json'
      },
      data: {
        channel: steps.parse_command.channel,
        text: `Site Diagnostic Report`,
        blocks: [
          {
            type: "header",
            text: {
              type: "plain_text",
              text: `🔍 Diagnostic Report: ${steps.parse_command.url}`
            }
          },
          {
            type: "section",
            text: {
              type: "mrkdwn",
              text: `*Load Time:* ${steps.webpagetest.loadTime}ms\n*TTFB:* ${steps.webpagetest.ttfb}ms\n*Requests:* ${steps.webpagetest.requests}\n*Page Size:* ${(steps.webpagetest.bytesIn / 1024 / 1024).toFixed(2)}MB`
            }
          },
          {
            type: "divider"
          },
          {
            type: "section",
            text: {
              type: "mrkdwn",
              text: steps.claude_analysis.analysis
            }
          },
          {
            type: "context",
            elements: [
              {
                type: "mrkdwn",
                text: `Requested by <@${steps.parse_command.user}> | ${new Date().toLocaleString()}`
              }
            ]
          }
        ]
      }
    });
  }
});
Usage and Results
In Slack:
You: /diagnose https://slowclientsite.com
Bot: 🔍 Running diagnostics on https://slowclientsite.com... (this takes ~60 seconds)

[60 seconds later]

Bot: 🔍 Diagnostic Report: https://slowclientsite.com

Load Time: 4,823ms
TTFB: 1,247ms
Requests: 127
Page Size: 3.4MB

Overall Performance Grade: D (Significant issues detected)

Top 3 Performance Bottlenecks:
1. Server Response Time (1.2s TTFB) - Database queries taking too long
2. Render-Blocking Resources - 18 CSS/JS files loaded in <head>
3. Image Optimization - 2.1MB of uncompressed images

Quick Wins (<30 min, High Impact):
• Install WP Rocket or W3 Total Cache - Enable object caching
• Install Smush or ShortPixel - Auto-optimize images
• Enable Cloudflare free tier - Instant global CDN

Medium-Term Optimizations:
• Audit plugins - You have 47 active plugins, likely 10-15 can be removed
• Upgrade hosting - Shared hosting struggling with traffic
• Implement lazy loading for images

Hosting Recommendations:
Current: Shared hosting (overcrowded server)
Recommend: Cloudways (DigitalOcean $14/mo) or WP Engine ($30/mo)
Expected improvement: 50-70% faster load times

Requested by @shivanshi | Feb 11, 2026 2:34 PM
Time saved: 45 minutes of manual diagnostics → Instant automated report
Team impact:
- Support team can run diagnostics without technical knowledge
- Clients get immediate responses
- Consistent diagnostic methodology
- Data-driven optimization recommendations
Advanced: Multi-Site Performance Tracking
Extend this to track performance trends:
/ / Add Step 7: Log to Database
export default defineComponent({
async run({ steps, $ }) {
await require(“@pipedreamhq/platform”).axios($, {
method: ‘POST’,
url: process.env.AIRTABLE_API_URL,
headers: {
‘Authorization’: `Bearer ${process.env.AIRTABLE_API_KEY}`,
‘Content-Type’: ‘application/json’
},
data: {
records: [{
fields: {
‘Site’: steps.parse_command.url,
‘Date’: new Date().toISOString(),
‘Load Time’: steps.webpagetest.loadTime,
‘TTFB’: steps.webpagetest.ttfb,
‘Speed Index’: steps.webpagetest.speedIndex,
‘Grade’: extractGrade(steps.claude_analysis.analysis)
}
}]
}
});
}
});
Then build a dashboard showing performance trends over time for all monitored sites.
Building a Knowledge Base with Perplexity Spaces
One of the most frustrating parts of troubleshooting is solving the same problem twice because you forgot the solution.
The best way out? Setting up your WordPress troubleshooting space.
Step 1: Create the Space (5 minutes)
- Go to Perplexity.ai (Pro required, $20/month)
- Create Space: “WordPress Troubleshooting”
- Set purpose: “Search my documented WordPress fixes and known issues.”
Step 2: Add Your Documentation (ongoing)
Upload:
- Past incident reports
- Plugin conflict resolutions
- Custom code snippets that solved issues
- Client-specific configurations
- Hosting provider quirks
- Performance optimization notes
Formats supported: PDF, DOCX, TXT, Markdown, URLs
Step 3: Structure Your Documentation
Use a consistent format for every fix you document:
# Issue: [Brief Title]

**Date:** Feb 11, 2026
**Site:** clientsite.com (or "Multiple sites")
**Reported By:** Client / Monitoring / Internal

## Symptoms
- Homepage loading slowly (5+ seconds)
- Admin dashboard unresponsive
- Memory errors in logs

## Environment
- WordPress: 6.4.3
- PHP: 8.1.27
- Theme: Divi 4.23.1
- Key Plugins: WooCommerce 8.5.2, Elementor Pro 3.19.0
- Hosting: SiteGround GrowBig

## Root Cause
Elementor's widget caching conflict with WooCommerce product loops.
When Elementor cache enabled, it stores product queries with
outdated price data, causing infinite recalculation loops.

## Solution Applied
1. Disabled Elementor CSS cache:
   Elementor > Settings > Advanced > CSS Print Method > Internal Embedding

2. Excluded WooCommerce pages from cache:
   ```php
   // functions.php
   add_action('template_redirect', function() {
       if (is_woocommerce()) {
           define('DONOTCACHEPAGE', true);
       }
   });
Cleared all caches (Elementor, WooCommerce, server)
Results
Load time: 5.2s → 1.8s
Memory usage: Reduced by 40%
No errors in 7 days post-fix
Prevention
Don't enable Elementor CSS cache on WooCommerce sites
Monitor memory usage when using dynamic product widgets
Alternative: Use native WooCommerce blocks instead of Elementor widgets
Tags
#elementor #woocommerce #caching #memory #performance
Step 4: Use It When Troubleshooting
Next time you encounter an issue:
1. Open your Perplexity Space
2. Search: “Elementor WooCommerce slow”
3. Perplexity returns: “You solved this on Feb 11, 2026…”
4. Apply the documented solution in 5 minutes
Advanced: Automated Documentation
Integrate with your n8n workflow
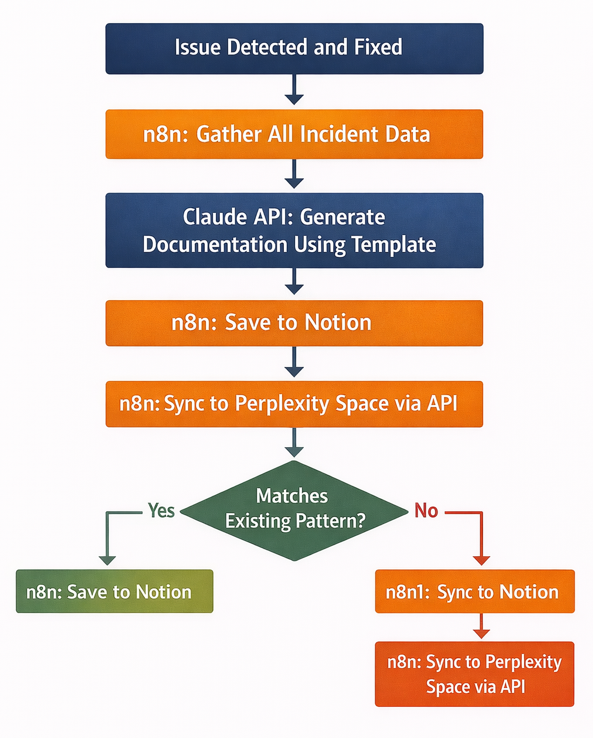
Claude API prompt for auto-documentation
```javascript
{
  "model": "claude-sonnet-4-20250514",
  "max_tokens": 2000,
  "messages": [{
    "role": "user",
    "content": `Generate incident documentation:

## Incident Data
Site: ${site_url}
Issue: ${issue_description}
Duration: ${duration}
Solution: ${solution_applied}
Timestamp: ${timestamp}

## Logs
${error_logs}

## Changes Made
${changes}

Create documentation following this template:
[paste your standard template]

Be specific, technical, and focus on reproducibility.
Tag appropriately for future searches.`
  }]
}
Best Practices and Safety Guidelines
The Golden Rules of AI-Assisted Troubleshooting
Rule 1: Always Work with Staging First
Never apply AI-suggested fixes directly to production.
Workflow:
- Reproduce issue on staging
- Get AI analysis
- Apply fix to staging
- Test thoroughly
- Deploy to production
- Monitor closely
If you don’t have staging: Create one. Digital Ocean $5/month droplet with your site cloned.
Rule 2: Backups Before Everything
Before applying any fix:
- Database backup
- File backup (or Git commit)
- Know your rollback procedure
- Test your rollback procedure
Tool recommendation: UpdraftPlus (free) with automated pre-change backups.
Rule 3: AI Generates Hypotheses, You Make Decisions
AI is not the decision maker.
Good: “Claude suggests this could be a caching issue. Let me verify by checking X, Y, Z.” Bad: “Claude said to do this, so I’ll do it without checking.”
AI analysis → Human verification → Informed decision → Action
Rule 4: Document Everything
Every incident should be documented:
- What broke
- How it was detected
- What analysis was performed
- What fix was applied
- What the outcome was
- How to prevent recurrence
Use AI to help write documentation (see Perplexity Spaces section), but ensure it’s done.
Rule 5: Understand Before Applying
If you don’t understand the suggested fix, don’t apply it.
Instead:
User to AI: “Explain this fix like I’m intermediate at WordPress development.
What does each line do? What could go wrong?”
Deep understanding prevents compounding errors.
Safety Checklist for Every AI-Assisted Fix
Before applying any AI-suggested solution, check:
- [ ] Do I have a current backup?
- [ ] Have I tested this on staging?
- [ ] Do I understand what this fix does?
- [ ] Have I checked official documentation?
- [ ] Can I roll this back in under 5 minutes?
- [ ] Is there any risk of data loss?
- [ ] Have I considered side effects?
- [ ] Is this a temporary fix or permanent solution?
- [ ] Have I documented this decision?
If any answer is “no” or “unsure,” pause and investigate before proceeding.
When to Ignore AI Suggestions
AI should be overridden when:
1. It suggests risky database operations
❌ AI: “Run this SQL to fix corruption: DELETE FROM wp_posts WHERE…”
✅ Better: Investigate root cause, use WordPress functions, backup first
2. It recommends disabling security features
❌ AI: “Disable XML-RPC to fix this issue”
✅ Better: Find the actual cause, don’t reduce security for convenience
3. It’s confident but vague
❌ AI: “This is definitely a caching issue”
✅ Better: “What evidence supports the caching hypothesis? What else could this be?”
4. It suggests quick fixes for complex problems
❌ AI: “Just increase memory_limit to 512M”
✅ Better: Why is memory usage high? What’s the actual problem?
5. Your gut says it’s wrong.
Developer intuition is valuable. If something feels off, investigate deeper.
Frequently Asked Questions
About Tools and Costs
Q: Do I need to pay for all these AI tools?
No. Start with free tiers:
- Claude: 50 messages/day free
- ChatGPT: Free tier available
- Perplexity: Free tier (3 Pro searches/day)
- n8n: Self-hosted = free
- Pipedream: Generous free tier
Upgrade when you hit limits or need advanced features. Most solo developers stay under $50/month total.
Q: Can I use free/open-source AI models?
Yes! Options:
- Ollama (run Llama, Mistral locally)
- LM Studio (GUI for local models)
- GPT4All (desktop app)
Pros: Free, private, no usage limits Cons: Requires decent hardware, less capable than Claude/GPT-4
Best approach: Use cloud AI for complex analysis, local models for simple tasks.
Q: Which tool should I start with?
Start with Claude Projects or ChatGPT Plus ($20/month).
- Most versatile
- Immediate value
- No automation needed
- Works for all troubleshooting
Add automation (n8n, Pipedream) only after you’re comfortable with AI-assisted manual troubleshooting.
About Safety and Accuracy
Q: How accurate is AI troubleshooting?
Based on real-world usage:
- Pattern recognition: 85-95% accurate (identifying issue type)
- Root cause analysis: 70-85% accurate (with good data)
- Specific solutions: 60-80% accurate (require human verification)
AI is excellent at narrowing possibilities, less reliable at picking the exact fix.
Q: What if AI suggests something that breaks my site?
This is why the safety checklist exists:
- You should have tested on staging first
- You should have backups
- You should understand the suggestion before applying
- You should know your rollback procedure
If you followed these: Rollback takes 2-5 minutes. If you didn’t: This is a learning opportunity to implement safeguards.
Q: Can AI hallucinate WordPress functions or hooks?
Yes. AI sometimes invents plausible-sounding but non-existent:
- WordPress functions
- Hook names
- Plugin features
- Configuration options
Always verify against official documentation before using unfamiliar functions.
Q: Is it safe to send my site data to AI services?
Depends what you send:
Safe:
- Error messages (sanitize URLs/domains)
- Code snippets (no credentials)
- Generic configurations
- Anonymized logs
Not safe:
- Database credentials
- API keys
- Customer personal data
- Payment information
- Private business logic
For sensitive sites: Use local AI models (Ollama) or enterprise AI (Claude on AWS Bedrock).
About Implementation
Q: How long does it take to set up these workflows?
Realistic timeframes:
- Claude Projects: 10 minutes
- Basic log analysis workflow: 30 minutes
- n8n auto-recovery system: 2-4 hours
- Pipedream diagnostic agent: 1-2 hours
- Perplexity knowledge base: Ongoing (add docs as you go)
Start small: Just Claude Projects in week 1. Add automation over next 2-3 months.
Q: Do I need programming skills?
Depends on workflow:
No coding needed:
- Claude/ChatGPT manual troubleshooting
- Perplexity research
- Basic Make.com workflows
Basic scripting helpful:
- n8n workflows (can use GUI but code helps)
- Pipedream (more code-focused)
- Custom integrations
Not needed: AI/ML expertise. You’re using AI as a tool, not building AI systems.
Q: What if my team is skeptical about AI?
Common objection: “AI will make mistakes.” Response: “Yes, which is why humans verify everything. AI speeds up analysis, you make decisions.”
Prove value:
- You personally use it for 2 weeks
- Track time saved on 5-10 incidents
- Present concrete results: “This used to take 3 hours, now takes 30 minutes”
- Offer pilot: “Let’s try it on staging sites for a month”
Q: Can AI replace a WordPress developer?
No. AI replaces tasks, not judgment.
AI handles:
- Pattern recognition in logs
- Suggesting potential causes
- Generating solution options
- Documenting incidents
Humans handle:
- Understanding business context
- Risk assessment
- Client communication
- Complex architectural decisions
- Accountability
Think “AI-assisted developer” not “AI replacement.”
About Specific Scenarios
Q: What about multisite networks?
AI troubleshooting works excellently for multisite:
- Quickly identify which subsite has issues
- Detect patterns across multiple subsites
- Analyze shared vs. subsite-specific problems
Add to your prompts:
This is a multisite network with 47 subsites.
Issue appears on subsites 3, 7, and 14.
Commonalities: All use same theme, different plugins.
Q: How do I troubleshoot custom plugins/themes?
Upload your custom code documentation to Claude Projects:
- README files
- Code architecture notes
- Known issues/limitations
Then include in prompts:
This site uses our custom membership plugin (see uploaded docs).
The issue involves [specific functionality]…
AI can read and understand your custom code if you provide context.
Q: What about WooCommerce-specific issues?
WooCommerce troubleshooting works particularly well with AI because:
- Common error patterns
- Well-documented
- Large community (AI trained on solutions)
Add WooCommerce docs to your Claude Project, then reference:
- WooCommerce version
- Payment gateways
- Shipping methods
- Active extensions
Q: Can AI help with security incidents?
Yes for detection and analysis:
- Identifying compromised files
- Analyzing suspicious behavior patterns
- Suggesting hardening measures
No for immediate response:
- Don’t rely solely on AI during active attack
- Follow your incident response plan
- Involve security professionals
Use AI as a diagnostic aid, not primary security tool.
Getting Started: Your 30-Day Implementation Plan
Week 1: Foundation
Day 1-2: Set Up Core Tools
- [ ] Create Claude Pro account ($20) or use free tier
- [ ] Set up Claude Project for WordPress troubleshooting
- [ ] Upload common plugin documentation
- [ ] Test with one old issue (practice run)
Day 3-4: Practice Manual AI Troubleshooting
- [ ] Take 3 recent issues you solved manually
- [ ] Re-run them through Claude Projects
- [ ] Compare: AI time vs. your manual time
- [ ] Refine your prompt structure
Day 5-7: Document Everything
- [ ] Create documentation template
- [ ] Document your last 5 fixes using the template
- [ ] Upload to searchable system (Notion or Perplexity)
Week 2: Expand Capability
Day 8-9: Add Visual Debugging
- [ ] Set up ChatGPT Plus (or use free tier)
- [ ] Practice with screenshot-based troubleshooting
- [ ] Test with 3 visual layout issues
Day 10-12: Research Tool Setup
- [ ] Set up Perplexity (free tier fine to start)
- [ ] Create your troubleshooting Space (if Pro)
- [ ] Practice research: Known plugin conflicts, version compatibility
Day 13-14: Integrate Into Daily Workflow
- [ ] Use AI for every troubleshooting task this week
- [ ] Track time saved per incident
- [ ] Note which types of issues AI helps most with
Week 3: Automation Begins
Day 15-17: Install Automation Platform
- [ ] Choose: n8n (self-hosted) or Make.com (cloud)
- [ ] Set up account
- [ ] Connect to your WordPress management tool (MainWP/ManageWP)
- [ ] Build first simple workflow: Log monitoring → Slack alerts
Day 18-19: Diagnostic Agent
- [ ] Set up Pipedream account
- [ ] Build basic diagnostic workflow
- [ ] Test with 3 sites
- [ ] Refine based on results
Day 20-21: Review and Adjust
- [ ] Review what’s working, what isn’t
- [ ] Refine prompts based on 2 weeks of use
- [ ] Update documentation templates
- [ ] Share results with team (if applicable)
Week 4: Advanced Implementation
Day 22-24: Auto-Recovery System
- [ ] Build n8n auto-detection workflow
- [ ] Start with monitoring only (no auto-fixes yet)
- [ ] Test for 48 hours
- [ ] Verify alert accuracy
Day 25-26: Gradual Auto-Fix Introduction
- [ ] Enable auto-fix for lowest-risk issues only (cache clearing)
- [ ] Monitor closely for 48 hours
- [ ] Document every auto-fix action
- [ ] Verify no false positives
Day 27-28: Knowledge Base Completion
- [ ] Upload all documentation to Perplexity Space
- [ ] Test searches for common issues
- [ ] Verify you can find solutions quickly
Day 29-30: Measure and Report
- [ ] Calculate time saved (before/after comparison)
- [ ] Document ROI (time saved × hourly rate)
- [ ] Identify next expansion opportunities
- [ ] Create ongoing maintenance plan
Beyond 30 Days: Continuous Improvement
Monthly:
- Review auto-fix success rates
- Refine AI prompts based on failures
- Update documentation templates
- Add new solutions to knowledge base
Quarterly:
- Evaluate tool effectiveness (keep, upgrade, or replace?)
- Calculate ROI
- Expand automation to new issue types
- Team training (if applicable)
Annually:
- Comprehensive workflow audit
- Technology update review (new AI tools?)
- Strategy refinement
Conclusion: The Future of WordPress Troubleshooting
WordPress troubleshooting isn’t becoming simpler. It’s becoming more complex as the ecosystem expands. Plugin counts grow, hosting environments diversify, PHP evolves, AI code is used, and user expectations rise.
Traditional manual troubleshooting won’t scale to meet these demands. AI for technical support isn’t about replacing developer expertise but about amplifying it so you can handle growing complexity without burning out.
The developers and agencies thriving today are those who’ve stopped treating troubleshooting as reactive firefighting and started treating it as a system that can be optimized, automated, and improved.
This guide gave you the complete toolkit:
- Tools for every type of WordPress troubleshooting
- Workflows that you can implement immediately
- Safety practices that protect you from AI mistakes
- Real-world examples proving the value
But reading isn’t implementing.
Your next step: Pick one workflow from this guide. Spend 2 hours implementing it this week. Track the time saved on your next 3 troubleshooting incidents.
Your future self (the one not troubleshooting at 11 PM on Friday) will thank you.